Monday, December 29, 2008

End of 2008 review


Well, another year in the restoration of my 1961 built T343 is drawing to a close and this feels like the final hurdles just before completion, which is great.
I have pressed on with the reinstatement of the dashboard instruments and trim and just need to connect the final wiring and then install the push button switch unit. Before doing this I need to install the courtesy lighting wiring loom.
I have also now finished the rear luggage compartment and am part way through the fit up of the first door - see picture above. I have also posted a series of comparison photos so you can see how far the car has come.

Bodywork Comparisson


Here is a photo that shows how far the body has come at surface level without being able to show all the skill that has gone into getting it this far.

Seating Comparisson


I have published these before but still worth a review.

Front Luggage Comparisson


Photos showing before and after in the front luggage area.

Rear Luggage Compartment Comparisson


Photos showing before and after in rear luggage compartment.

Dashboard Comparisson


Photos of dashboard before and after restoration.

Friday, December 19, 2008

Santa has arrived early


Just catching up with things after being away for a while and hope to do more refitting of the car over the Christmas and New Year break.
Meantime santa has delivered a new heater control knob, correct for the Karmann Ghia with its little red dot. The one on the car when it arrived was beyond use, I managed to find a used replacement but it had broken in the past and was glued back together. Now I have a very pricey but excellent NOS replacement in its little bag ready to be fitted.

Wednesday, November 26, 2008

November update 3

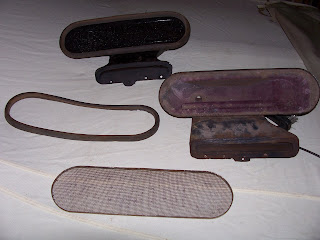
Both air intake troughs have now been reconditioned and refitted. Unfortunately the drivers side one doesn't seem to want to fit flush under the scuttle panel, leaving a nice gap for the water to come in through. I need to investigate further but this will have to wait until December due to being away with work.
The trims for the A & B posts have been made and will be fitted once I start the fit out of the central interior section.
That's it folk for November- back in December when I hope to make a little more progress.

Sunday, November 09, 2008

November update 2


With the rear boot area completed I have been gathering up from around the garage all that is needed to finish fitting up the dash board. The main thing to work on is the air intake troughs that fit under the vents in the front scuttle. I restored one early on in the restoration and now need to clean up and repaint the other and renew the rubber hinged flap.


After this is complete the next major areas will be fitting of the roof linning and the trim around the doors on the A & B posts. The existing A&B post pillar trims fell to pieces when I dismantled the car. I had some other ones from another car I broke up and have used a length of black material similar to the original and some flexible rubber fuel hose as the basis for recreating them. The ends of the pipe need to be shaped correctly as in the photo. I will investigate if our sewing machine can do the stitching required, if not i will plead with a friend to do it for me.


I have a replacement roof lining, this needs some work before it can be fitted, including getting out lines in it from where it has been folded in storage - moral is that if material arrives folded then unwrap and roll up instead.

Sunday, November 02, 2008

November update 1


Here is a shot of the old rear boot floor linning laid out on a piece of replacement Hardura linning material ready to be cut to shape. The early cars did not have the Auf\Zu signs on them and had textured Hardura rather than smooth surfaced material. This makes it easy to source and replicate as it is the same as early Jaguar boot linning material and that of other British classics.


Also here is a shot of the fully refurbished rear boot area.

Info for Simon

Hi Simon

Draw back of blogs is there is no e-mail for direct response, so here are the answers to the questions in your comment, hope they help.
I got my head linning from Lars Neuffer in Germany. It you are up to making your own, which we did for our 65, then Woolies trim do an excellent material match (called off white perforated, catalogue number 334) you need 2 metres from what I recall at £12 a metre and some plain white material for the pillars (roof linning from an early Golf used to be a good match).
For Chroming I used The London Chroming co in the Old Kents Road, SE15. Results are outstaning and about the mark for good quality work. Cheaper option in Premier Plating in High Wycombe.
If you are a member of the KGOC(GB) then do contact me at the e-mail address for the T34 register secretary, or post a comment again with contact details which I can see and withold from publication

Wednesday, October 29, 2008

October update 4

Success at last with the wiring loom. I removed it once again and then undid some of the binding I had put on and shortened some of the wires by folding them back on each other so that there were no big groups of connectors before re-binding. I then did as suggested by Mark Poulton, greased the cable and heated every thing up. I can't say that it flew through but it is now in place.
I have put all of the rear cables in place and connected everything up at the rear end. Just the front end to the fuse box etc. left to do. This will now allow me to press on with putting all of the rear boot linings etc in place. once that is done I will concentrate on the centre section of the car, starting with the new head lining.

Monday, October 27, 2008

October update 3


No major movement forward with the wiring loom, other than a few bruises here and there from pulling it in and out. I have however sourced a replacement rubber for the spare wheel well to carrier frame. This is of a much larger cross section and hollow but has worked well and allowed me to fit the spare wheel well permanently using hex headed self taping screws in place of the original small bolts. It is very difficult to notice the difference between the self tappers and bolts, this approach was needed as no captive nuts were built into the newly built carrier frame when it was created. There was little left for the body shop to work from and I forgot to mention it to them.

An interesting small piece of trim difference can be seen in the photo for this posting. The long piece of black material goes on top of the painted dash, around the various vent outlets. I am not sure when this process was stopped in favour of the individual pieces photographed alongside it that were used on cars such as my 65 model 344. To make this work the top of the dash was sprayed black to cover up the areas where no black plastic was provided. There is a small break in the plastic on the inner edge but this will be covered up as the top dash pad sits directly on top of it.

Thursday, October 16, 2008

October update 2

Fitting of the main wiring loom is going slowly. The loom is all the way through the sill and has exited the hole at the top of the A pillar by about 6 inches. It appears to be stuck and I suspect that the problem likes at the bottom of the pipe in the A pillar and that the casing for the loom is catching on the entry to this. I am going to wait until the weekend and then, once the car is in the open, see if I can free things off.
Meanwhile not a lot of othr progress as I don't want too many jobs started at once.

Sunday, October 05, 2008

October update 1


During the last week I have rebuilt and fitted the twin tone horns and have been slowly reconnecting the front wiring loom to the push button light\wiper switch unit, new fuse box and relays etc. this seems to be going well so far and I intend to press on and fit the small inner light, door switch loom and then the main rear wiring loom over the next week or so.

I am looking forward to receiving a rear wing drain tube from Bert3 in Belgium shortly, he was breaking a May 62 T34 which has exactly the correct sort of drain tube fitted only to the early cars, the one on the right is the earlier type and the body work has a narrower outlet in the bottom of the rear wing to accommodate it.

Sunday, September 21, 2008

September update 4


I have continued to concentrate on the front of the car and have now finished the majority of the front boot area, other than securing the spare wheel well and adjusting the front bumper and boot lid.

The other major task remaining is to get the headlights to fit. The correct headlamp to body work seals are proving too thick to enable the top of the headlamp rim to locate on the headlight bowl hook. I have adjusted the hook as best as possible and removed excess paint from the rear, as well as checking that the headlight rim retainer springs are not in the way but so far no joy. My approach is leave them until next week and have a beer!

Tuesday, September 16, 2008

September update 3


I have refitted the fog lights after putting the new front wiring loom in place etc. Luckily I had one original remaining fog light to body seal (dark grey in colour). To replicate them I took some NOS T14 inner headlight seals (light grey, like the headlight to body seals) that go around the lense and cut of the outer edge of them and then adjusted them to the correct length and super glued them together to make great replacement seals.


I have also recreated the front bonnet drain pipe. To do this I took a T14 front bonnet corner drain and cut it in 2 as in the photo. I then purchased some tubing with the correct internal diameter to accommodate the end of the corner drain with the 90 degree bend. Once this was glued in place I located this in the hole in the front slam panel and then made an cross shaped incision in the top of the rubber horn knickers used for covering pre 65 model T34s, ensuring that the pipe went far enough into the knickers so that the water drained externally rather than accumulating inside the knickers or entering the car.
To do this for 65 and later model cars it is advisable to use 2 T14 front bonnet corner drains, using one at the top and one at the bottom where it will exit through the horn hole blanking plate (As horns fitted to bumpers).
If you are really careful with your craft knife you can also take the part from an old pair of the rubber horn knickers that goes into the horn hole and cut an extra slot into the internal lip to accommodate the blanking plate as well as this rubber is no longer available. did this on my 65 back in 1992 and it is still working OK.

Saturday, September 06, 2008

September update 2


I have concentrated on installing the front wiring loom today. the reproduction loom made by Autosparks is excellent and they built in all the repairs to the loom that were needed to bring it back to original spec. One thing I left as it was on the original loom was the wire from the horn relay to the fuse box. This was black with a yellow stripe, rather than green in the wiring diagram.

Next on my plan is to press on and finish everything in the front bonnet area and then move to the installation of the main loom and completion of the rear boot area.

When trial fitting the lower dash pad as mentioned in a previous posting, I found that as expected the later post may 62 padded dash pad that I bought won't fit my pre may 62 dash without alteration. You can see why if you look at the photo of my dash versus the dash of Paul Colberts car (thanks Paul, photo lifted from your site).
In May 62 the steering column was raised 20mm and they did this by cutting out a section of the dash board. The later padded dashes therefore won't fit as they are not recessed to accommodate the area over the top of the steering column that was removed and existed on the first production cars.

Wednesday, September 03, 2008

September update 1


I have fitted the brake fluid reservoir and line to the master cylinder and refitted the petrol tank and breather pipes. Also now installed in the front boot is the tank top liner,flip up tray for the spare wheel and the paint colour code sticker. once I have the spare wheel well back from the body shop then that can be fitted as well. Photo shows the area before some final paint touching up was completed.

At the rear the air control flap in the engine bay and cardboard intake pipe is in place along with the rubber belows and correct clamps. I had a NOS set of bellows - went to fit them and my fingers went straight through the rubber whilst manipulating them into place - luckily as usual I had a good used one in the cupboard and that has now been fitted.

the rear and side badges are in place, the side ones look to be a bit of an issue as the Karmann script looks out of line - not going to worry at this stage as I shall accumulate any issue and take the car to the body shop at the end of the fit up for final sorting. This is a problem of my making as I drilled the holes.

I offered up the lower dash pad to see if it would fit OK - early 62 cars had a slightly different lower dash area, cars from May 62 had the steering column raised 20mm, this altered the dash shape and the lower pad shape. So looks like I will need to be brave and cut the rear of my later lower pad to make it fit.

I have been fitting the various heater pipes inside the car, I am sure I took photos of where each of them went and I know roughly their location under the rear seats and in the inner rear wing to rear screen outlet but am no longer sure which goes where. Without the photos it will be a process of elimination. one pipe needs sections replacing and I have the correct diameter tubing to do this, a task for the weekend.

Tuesday, August 26, 2008

August progress 1


Since getting the body back time has unfortunately been in shorter supply than anticipated but some progress has been made.

All bolts for the chassis are loosely in place with the exception of one large frame head bolt which refused to go in. I will try again this weekend and if needed use a tap to clear the thread in the captive bolt, nothing is being tightened down until that is in place.

Front and rear boots have now been fitted, some minor adjustment is needed to get the correct gaps but they are safely installed on the car. I will leave the doors off for the time being as space is tight and this should prevent damage to them.

The seats are loosely installed as well to keep them safe from the marauding dog.

A few minor problems have surfaced, none paint related, the spare wheel restraint bar (best way I can describe it) has been welded to the inner wing in the wrong place. this stops the jack being stored in the front boot and lets the spare wheel move around too much. the paint shop say they can help sort this for me. Also I thought I had sourced a missing early rear air intake to rear wing drain pipe but I can't find one - if anyone has a correct driver side one then let me know - it is the shorter flat ended one in the photo and has a narrow end, this prevents the later ones being used.

When little issues like this come up I turn my attention to simpler tasks like small trim item fitting, this is good as it also gives the illusion of progress as well. Even here things don't always go as well as expected - the drivers side sill trim clips are not holding the trim in place as well as they should and I will have to think about a remedy for this.

Anyway, reasonable progress so far and I will look to do more at the weekend.

Thursday, August 14, 2008

Back to black and back home


The bodyshop delivered the bodyshell back home this afternoon - it looks absolutely fantastic. the doors and bonnets will follow in the next few days.


They managed to weld up the two horn wire holes in the front panel that I had missed - these were only on cars from 65 model onwards once the horns became externally mounted.


Anyway I have an initial plan of action for the weekend which will be;


  • Fit the bumpers and get them out of harms way and give protection to the car


  • Bolt the chassis down


  • Fit the steering column


  • Fit all locks and latches where ever possible


I am not going to rush after all this time but will move on at a good pace.

Saturday, August 09, 2008

Its in the spray booth


The 62 has had its' final prep finished and is now in the spray booth. It will be sprayed on Monday and hopefully home by next weekend. It's come a long way from a car that was de-registered and classified as scrap in South Africa which again was an accurate description. The final stages are close and re-assembly will be a pleasure.

Friday, August 08, 2008

Front Axle - here we go again

Well the front axle and chassis have been completed for a couple of years now. I decided to replace the 2 smaller rubber bumps stops with new ones that I bought and during the process also replaced the track rod end boots that had perished since fitting. Not good as they were new stock, not NOS.
Whilst doing all this I noticed that the rubber boots on the 2 upper ball joints were also cracking. These were NOS in the box but a good number of years old. I dug out the ball joints that I took of the car and luckily the boots on them were perfect, strange as I think one was an original item.
I called the body shop today, they have finished rubbing down and perfecting and the car goes into the spray booth today for final prep coat and hopefully top coats next week.

Friday, August 01, 2008

Trim items


Having completed the bumpers I am now digging around in my boxes of trim to see where some work is needed before re-assembly.

I needed a new rear boot rubber, these are not available with the original moulded lower corners. Digging around in my cupboard of wonder produced a nearly complete rubber, all present except for the piece that goes around the are for the oil filler. Lee Hedges gave me bits of an old rubber when I was over visiting him and luckily I was able to salvage the missing piece from that.

It will all need a good clean up and gluing here and there but will look better, even if slightly worn, that the reproduction ones.

At the same time I dug out some old trims for the A & B posts, these fell apart when I took them off the car, luckily I have enough of the 3 I found to be able to recreate some new ones.

video of our 65 on the motorway

video of our 65 on the M40 taken by Paul  Donovan https://m.youtube.com/watch?v=Y5pXVCcqGfA